Difference between revisions of "AWS/Connect over SSH to EC2"
m (Pio2pio moved page AWS connect over SSH to EC2 to AWS/Connect over SSH to EC2 without leaving a redirect) |
|||
| (37 intermediate revisions by the same user not shown) | |||
| Line 1: | Line 1: | ||
= How to connect password-less from Windows Putty to Linux OpenSSH = | |||
#Run PuTTYgen.exe and generate a key | |||
#Copy the public key into clipboard. It's already in OpenSSH format | |||
#Login to Linux box and append the key to <code>~/.ssh/authorized_keys</code> file<br><code>vi ~/.ssh/authorized_keys<br>chmod 600 ~/.ssh/authorized_keys #change permissions if the file did not exist</code> | |||
#In PuTTY save the private key on a disk as .ppk file | |||
#Double click on it to load into Pageant (key agent) | |||
#Open Putty and connect to the remote linux box. | |||
The key pair authentication is automatic lookup of matching authorized keys. The key itself does not contain any encoded information like user name or host name, the comment field is arbitrary description not taken into account when connecting. | |||
;The connection will success as long | |||
* the private key is specified in Putty session or loaded into Peagant key agent | |||
* the public key is in <code>~/.ssh/authorized_keys</code> file on a remote server where the matching lookup process authenticate the connection | |||
;6 visual steps to connect | |||
[[File:Quick-putty-connect-passwordless.PNG|none|left|Quick-putty-connect-passwordless]] | |||
= Theory: private and public keys = | = Theory: private and public keys = | ||
Ssh protocol can authenticate a user without password by using a key | Ssh protocol can authenticate a user without password by using a private key that is matching a public key installed on a remote server. | ||
<gallery widths=400px heights=300px> | <gallery widths=400px heights=300px> | ||
File:Ssh-pem-pub-keys.png | File:Ssh-pem-pub-keys.png | ||
| Line 7: | Line 24: | ||
;OpenSSH - secure keys management | ;OpenSSH - secure keys management | ||
Each user home | Each user home has ~/.ssh/ hidden subdirectory with files: | ||
-rw-r--r-- | -rw-r--r-- authorized_keys #contains a list of public keys (the contents of id_rsa.pub) one per line that are allowed to | ||
-r-------- | login with the corresponding private key (the id_rsa file) | ||
-rw-r--r-- | -r-------- id_rsa #contains the user private key on the current system | ||
-rw-r--r-- id_rsa.pub #contains public key that can be copied/(append to authorized_keys file) on another system | |||
allowing ssh logon without password | |||
-rw-r--r-- known_hosts #contains PUB keys of hosts you connected at least once. If the key is not in you will be prompted: | |||
''ECDSA key fingerprint is 0b:4e:13:85:4d:d2:1c:09:b8:6e:4c:20:04:76:c1:bd.'' | |||
''Are you sure you want to continue connecting (yes/no)?'' | |||
Command <code>ssh-keygen</code> generates interactively a key pair of 2 files in default ~/.ssh location | |||
*<tt>id_rsa</tt> - private key, stays with us and should never be copied to another system | |||
*<tt>id_rsa.pub</tt> - public key, to be installed on remote system | |||
You can add PUB keys to known_hosts file by | |||
ssh-keyscan hos1 host2 host3 >> ./.ssh/known_hosts | |||
= Theory: ways to connect without password = | |||
*You can use a private key <tt>id_rsa</tt> copied from a remote server to connect to the remote server. | |||
*Or you can append PUB key to <tt>authorized_keys</tt> file on a remote server and then use the matching private key to connect from a client. | |||
It's worth to note that PuTTY and OpenSSH key files formats are not compatible although both are flat text files. | |||
= Download | = Download private key from EC2 Instance = | ||
Your | Your OpenSSH key pair is generated at the time you build EC2 instance. The '''key pair name''' used for connection to the instance is listed under EC2 Dashboard > Network & Security > Key Pairs. You should have already downloaded a copy of the private key onto your local machine during the instance creation. The key pair used to connect to the specific instance is listed on the Instances screen > '''Key Pair Name:''' | ||
[[File:Instance-keypair.png|none|400px|thumb|left|Instance-keypair]] | [[File:Instance-keypair.png|none|400px|thumb|left|Instance-keypair]] | ||
= Generate private PEM | |||
The | = Generate private PEM and public PUB key pair in Linux = | ||
The command below generates 2 files that make up a secure key pair, <tt>id_rsa</tt> file contains a private key and <tt>id_rsa.pub</tt> file is a public key. During the key generating you will be prompted for passphrase that can add extra layer of security but it can be ignored by pressing [enter] twice. You should also change a file permissions of the private key to read_only by the owner as per [http://docs.aws.amazon.com/AWSEC2/latest/UserGuide/EC2_GetStarted.html#EC2_ConnectToInstance_Linux Getting Started with Amazon EC2 Linux Instances] | |||
You should change a file permissions of the key to read_only by the owner as per [http://docs.aws.amazon.com/AWSEC2/latest/UserGuide/EC2_GetStarted.html#EC2_ConnectToInstance_Linux Getting Started with Amazon EC2 Linux Instances] | ssh-keygen #generates RSA key pair using defaults | ||
chmod 400 | chmod 400 id_rsa.pem #makes readable only by the owner | ||
-r------- 1 user user 1766 Aug 18 01:17 mykey.pem | -r------- 1 user user 1766 Aug 18 01:17 mykey.pem | ||
= | = Password less login - Linux to linux - install public key onto a remote system = | ||
The key | For a password less login we need to append public PUB key to a remote system <tt>~/.ssh/authorized_keys</tt> file. | ||
The public key was generated on our local Linux machine usually has <tt>.pub</tt> extension. Openssh using ssh-keygen command names creates <tt>id_rsa.pub</tt> file that contains the public key. The content of this file needs to be added to a remote system <tt>~/.ssh/authorized_keys</tt> file. We have two options to achieve this: | |||
From a '''local''' | ;Option 1 - append the key manually | ||
From a '''local''' Linux box copy a public key over to the remote host | |||
scp ~/.ssh/mykey.pub ubuntu@ec2-user@ec2-99-99-99-99.compute-1.amazonaws.com:/home/ubuntu/.ssh/ | scp ~/.ssh/mykey.pub ubuntu@ec2-user@ec2-99-99-99-99.compute-1.amazonaws.com:/home/ubuntu/.ssh/ | ||
On | On a '''remote''' EC2 instance/linux append content of <tt>mykey.pub</tt> to <tt>~/.ssh/authorized_keys</tt> file. This is known as installing the public key to a server. | ||
ssh {ubuntu|ec2-user}@ec2-99-99-99-99.compute-1.amazonaws.com | ssh {ubuntu|ec2-user}@ec2-99-99-99-99.compute-1.amazonaws.com | ||
cat ~/.ssh/mykey.pub >> ~/.ssh/authorized_keys | cat ~/.ssh/mykey.pub >> ~/.ssh/authorized_keys | ||
= Connect to | ;Option 2 - use ssh-copy-id command | ||
This is so called installing identity by pushing our public key from the local machine by <tt>ssh-copy-id</tt> command that will append .pub key to the remote host ~/.ssh/authorized_keys file. It's important to use FQDN for the remote host | |||
ssh-copy-id -i ~/.ssh/id_rsa.pub {ubuntu|ec2-user}@ec2-99-99-99-99.compute-1.amazonaws.com | |||
= Connect to EC2 instance = | |||
== EC2 default Linux usernames == | |||
*Ubuntu user: '''ubuntu''' (confirmed) | *Ubuntu user: '''ubuntu''' (confirmed) | ||
*RedHat user: '''root''' (tbc) | *RedHat user: '''root''' (tbc) | ||
| Line 41: | Line 81: | ||
*CentOS user: '''centos''' (tbc) | *CentOS user: '''centos''' (tbc) | ||
== Connect from Linux == | == Connect from Linux == | ||
ssh -i myprivkey.pem ubuntu@ec2-user@ec2-99-99-99-99.compute-1.amazonaws.com | |||
ssh -i | |||
== Connecting from Windows == | -l username #specifies Linux account user name, in example above username ubuntu@ is used | ||
-v #verbose mode | |||
== Connecting from Windows using PuTTY == | |||
PuTTY does not natively support OpenSSH private key format (.pem) generated on Amazon EC2 instance. This private key file is in a form called PEM – "Private Enhanced Mail". PuTTY cannot work with PEM files. PuTTY has a tool named PuTTYgen, which can convert keys to the required PuTTY format (.ppk). You must convert your private key into PuTTY format (.ppk) before attempting to connect to your instance using PuTTY. | PuTTY does not natively support OpenSSH private key format (.pem) generated on Amazon EC2 instance. This private key file is in a form called PEM – "Private Enhanced Mail". PuTTY cannot work with PEM files. PuTTY has a tool named PuTTYgen, which can convert keys to the required PuTTY format (.ppk). You must convert your private key into PuTTY format (.ppk) before attempting to connect to your instance using PuTTY. | ||
; | ;Convert your PuTTY-gen private key to OpenSSH readable key | ||
# Start PuTTYgen (All Programs > PuTTY > PuTTYgen). | # Start PuTTYgen (All Programs > PuTTY > PuTTYgen). | ||
| Line 54: | Line 97: | ||
# Click '''Save private key''' to save the key in the format that PuTTY can use. PuTTYgen displays a warning about saving the key without a passphrase. Click '''Yes'''. <u>Note:</u> A passphrase on a private key is an extra layer of protection, so even if your private key is discovered, it can't be used without the passphrase. The downside to using a passphrase is that it makes automation harder because human intervention is needed to log on to an instance, or copy files to an instance. | # Click '''Save private key''' to save the key in the format that PuTTY can use. PuTTYgen displays a warning about saving the key without a passphrase. Click '''Yes'''. <u>Note:</u> A passphrase on a private key is an extra layer of protection, so even if your private key is discovered, it can't be used without the passphrase. The downside to using a passphrase is that it makes automation harder because human intervention is needed to log on to an instance, or copy files to an instance. | ||
# Specify the same name for the key that you used for the key pair (for example, my-key-pair). PuTTY automatically adds the .ppk file extension. | # Specify the same name for the key that you used for the key pair (for example, my-key-pair). PuTTY automatically adds the .ppk file extension. | ||
Your private key is now in the correct format for use with PuTTY. You can now connect to your instance using PuTTY's SSH client | Your private key is now in the correct format for use with PuTTY. You can now connect to your instance using PuTTY's SSH client. | ||
; | ;Connect using a private key | ||
#To do so, you need to specify a path to your private key first. | |||
#Open PuTTY | |||
#Navigate to '''Connection>SSH>Auth>Private key file for authentication (Browse...)''' | |||
#Open location of the PPK file to be used for the connection | |||
#Save the session | |||
#Open the session to initiate the connection. | |||
== Convert .pem and .ppk private keys == | |||
<code>.pem</code> is OpenSSH private key format whereis <code>.ppk</code> is PuTTY prive key format. The <tt>puttygen</tt> cross platform tool can convert keys. | |||
;Convert in Ubunu | |||
<source lang="bash"> | |||
$ sudo apt-get install putty-tools | |||
$ puttygen yourKey.ppk -O private-openssh -o yourKey.pem | |||
$ puttygen yourKey.pem -O private -o yourKey.ppk | |||
</source> | |||
;Convert in Windows | |||
<source lang="batch"> | |||
c:\ puttygen yourKey.pem -O private -o yourKey.ppk | |||
</source> | |||
*<code>-o</code> output file | |||
*<code>-O private</code> output PuTTY private key format | |||
*<code>-O private-openssh</code> export OpenSSH private key | |||
*<code>-O private-sshcom</code> export ssh.com private key | |||
== PuTTY Pageant - pre-load a private key for password less login == | |||
PuTTY Pageant is an agent that holds in a memory a list of private keys (PPK files). When you connect via PuTTY and type in a user name the agent (Pageant) is using matching key to log you in. | |||
;How to use Pageant | |||
Double-click on the PPK file to load into PuTTY '''Pageant''' key agent that holds keys in RAM and use them for each connection you do using PuTTY | |||
[[File:Pageant-key.PNG|none|left|Pageant-key]] | |||
On successful login in you will see message verifying that you authenticated using a key form an agent (read Pageant) | |||
[[File:Log-in-with-pageant.PNG|none|left|Log-in-with-pageant]] | |||
== Remove host from SSH known_hosts file == | == Remove host from SSH known_hosts file == | ||
| Line 64: | Line 141: | ||
ssh-keygen -R hostname | ssh-keygen -R hostname | ||
== Generate pub from private key == | |||
ssh-keygen -y -f mykey.pem > mykey.pub | |||
== Thumbprint aka fingerprint of public key == | |||
Sometimes we may have a number private keys and when comparing names it could be confusing. Therefore to uniquely identify the we can use public key thumbprint. Note it's not possible to get private key thumbprint and that would be insecure to share such information. Also useless for a server side. Therefore the snippet below generate public part then generate ''fingerprint'' base on it. This also will represent private part of the keypair. | |||
<source lang="bash"> | |||
$ file id_rsa #confirm type of file first | |||
id_rsa: PEM RSA private key | |||
for i in $(ls -1 *.pem); do printf "$i "; timeout 10 ssh-keygen -lf /dev/stdin <<< $( ssh-keygen -f ~/.ssh/${i} -y ); done | column -t | |||
</source> | |||
This uses the bash here string <code><<<</code> in order to have <code>stdin</code> available as a regular file <code>/dev/stdin</code> rather than a pipe as ssh-keygen will only operate on a file. As of Release 7.2 of openssh ssh-keygen supports fingerprinting from standard input: <tt>ssh-keygen(1): allow fingerprinting from standard input, e.g. "ssh-keygen -lf -"</tt>. | |||
= EC2 Security Group = | = EC2 Security Group = | ||
Remember to assign the security group that applies to your scheme on your instance. Having port open on the instance does not mean you will be able to access from outside. It must bypass '''EC2 Security Group''' first. Overview below: | Remember to assign the security group that applies to your scheme on your instance. Having port open on the instance does not mean you will be able to access from outside. It must bypass '''EC2 Security Group''' first. Overview below: | ||
[[File:Ec2-security-group.png|none|600px|thumb|left|Ec2-security-group]] | [[File:Ec2-security-group.png|none|600px|thumb|left|Ec2-security-group]] | ||
= Troubleshooting = | |||
== Error: Could not open a connection to your authentication agent == | |||
Ensure ssh-agent is enabled and if not use commands below to run in background: | |||
If you are using Git Bash, turn on ssh-agent: | |||
ssh-agent -s | |||
# Agent pid 59566 | |||
If you are using another terminal prompt, such as msysgit, turn on ssh-agent: | |||
eval $(ssh-agent -s) | |||
# Agent pid 59566 | |||
Eval command line break down: | |||
* syntax <code>$(ssh-agent -s)</code> is equivalent of backticks <code>`ssh-agent -s`</code> and means evaluate and run as a command: | |||
<source lang=bash> | |||
$ ssh-agent -s | |||
SSH_AUTH_SOCK=/tmp/ssh-uW2ldhYdWXF4/agent.11701; export SSH_AUTH_SOCK; | |||
SSH_AGENT_PID=11702; export SSH_AGENT_PID; | |||
echo Agent pid 11702; | |||
</source> | |||
* <code>ssh-agent -s</code> returns environment variables so <code>eval</code> command tells to shell to run the command output as a script | |||
= Mobile secure shell = | |||
New generation of ssh try [https://mosh.org/ mosh] | |||
= References = | = References = | ||
| Line 73: | Line 189: | ||
*[http://docs.aws.amazon.com/gettingstarted/latest/wah-linux/getting-started-deploy-app-connect.html Connect to Your Amazon EC2 Instance from Windows Using PuTTY] | *[http://docs.aws.amazon.com/gettingstarted/latest/wah-linux/getting-started-deploy-app-connect.html Connect to Your Amazon EC2 Instance from Windows Using PuTTY] | ||
[[Category:ssh]][[Category: | [[Category:ssh]][[Category:aws]] | ||
Revision as of 14:19, 27 December 2018
How to connect password-less from Windows Putty to Linux OpenSSH
- Run PuTTYgen.exe and generate a key
- Copy the public key into clipboard. It's already in OpenSSH format
- Login to Linux box and append the key to
~/.ssh/authorized_keysfilevi ~/.ssh/authorized_keys
chmod 600 ~/.ssh/authorized_keys #change permissions if the file did not exist - In PuTTY save the private key on a disk as .ppk file
- Double click on it to load into Pageant (key agent)
- Open Putty and connect to the remote linux box.
The key pair authentication is automatic lookup of matching authorized keys. The key itself does not contain any encoded information like user name or host name, the comment field is arbitrary description not taken into account when connecting.
- The connection will success as long
- the private key is specified in Putty session or loaded into Peagant key agent
- the public key is in
~/.ssh/authorized_keysfile on a remote server where the matching lookup process authenticate the connection
- 6 visual steps to connect

Theory: private and public keys
Ssh protocol can authenticate a user without password by using a private key that is matching a public key installed on a remote server.


- OpenSSH - secure keys management
Each user home has ~/.ssh/ hidden subdirectory with files:
-rw-r--r-- authorized_keys #contains a list of public keys (the contents of id_rsa.pub) one per line that are allowed to
                               login with the corresponding private key (the id_rsa file)
-r-------- id_rsa          #contains the user private key on the current system
-rw-r--r-- id_rsa.pub      #contains public key that can be copied/(append to authorized_keys file) on another system
                               allowing ssh logon without password
-rw-r--r-- known_hosts     #contains PUB keys of hosts you connected at least once. If the key is not in you will be prompted:
                           ECDSA key fingerprint is 0b:4e:13:85:4d:d2:1c:09:b8:6e:4c:20:04:76:c1:bd.
                           Are you sure you want to continue connecting (yes/no)?
Command ssh-keygen generates interactively a key pair of 2 files in default ~/.ssh location
- id_rsa - private key, stays with us and should never be copied to another system
- id_rsa.pub - public key, to be installed on remote system
You can add PUB keys to known_hosts file by
ssh-keyscan hos1 host2 host3 >> ./.ssh/known_hosts
Theory: ways to connect without password
- You can use a private key id_rsa copied from a remote server to connect to the remote server.
- Or you can append PUB key to authorized_keys file on a remote server and then use the matching private key to connect from a client.
It's worth to note that PuTTY and OpenSSH key files formats are not compatible although both are flat text files.
Download private key from EC2 Instance
Your OpenSSH key pair is generated at the time you build EC2 instance. The key pair name used for connection to the instance is listed under EC2 Dashboard > Network & Security > Key Pairs. You should have already downloaded a copy of the private key onto your local machine during the instance creation. The key pair used to connect to the specific instance is listed on the Instances screen > Key Pair Name:

Generate private PEM and public PUB key pair in Linux
The command below generates 2 files that make up a secure key pair, id_rsa file contains a private key and id_rsa.pub file is a public key. During the key generating you will be prompted for passphrase that can add extra layer of security but it can be ignored by pressing [enter] twice. You should also change a file permissions of the private key to read_only by the owner as per Getting Started with Amazon EC2 Linux Instances
ssh-keygen             #generates RSA key pair using defaults
chmod 400 id_rsa.pem   #makes readable only by the owner
-r------- 1 user user 1766 Aug 18 01:17 mykey.pem
Password less login - Linux to linux - install public key onto a remote system
For a password less login we need to append public PUB key to a remote system ~/.ssh/authorized_keys file. The public key was generated on our local Linux machine usually has .pub extension. Openssh using ssh-keygen command names creates id_rsa.pub file that contains the public key. The content of this file needs to be added to a remote system ~/.ssh/authorized_keys file. We have two options to achieve this:
- Option 1 - append the key manually
From a local Linux box copy a public key over to the remote host
scp ~/.ssh/mykey.pub ubuntu@ec2-user@ec2-99-99-99-99.compute-1.amazonaws.com:/home/ubuntu/.ssh/
On a remote EC2 instance/linux append content of mykey.pub to ~/.ssh/authorized_keys file. This is known as installing the public key to a server.
ssh {ubuntu|ec2-user}@ec2-99-99-99-99.compute-1.amazonaws.com
cat ~/.ssh/mykey.pub >> ~/.ssh/authorized_keys
- Option 2 - use ssh-copy-id command
This is so called installing identity by pushing our public key from the local machine by ssh-copy-id command that will append .pub key to the remote host ~/.ssh/authorized_keys file. It's important to use FQDN for the remote host
ssh-copy-id -i ~/.ssh/id_rsa.pub {ubuntu|ec2-user}@ec2-99-99-99-99.compute-1.amazonaws.com
Connect to EC2 instance
EC2 default Linux usernames
- Ubuntu user: ubuntu (confirmed)
- RedHat user: root (tbc)
- Amazon branded instances: ec2-user (confirmed)
- CentOS user: centos (tbc)
Connect from Linux
ssh -i myprivkey.pem ubuntu@ec2-user@ec2-99-99-99-99.compute-1.amazonaws.com

    -l username      #specifies Linux account user name, in example above username ubuntu@ is used
    -v               #verbose mode
Connecting from Windows using PuTTY
PuTTY does not natively support OpenSSH private key format (.pem) generated on Amazon EC2 instance. This private key file is in a form called PEM – "Private Enhanced Mail". PuTTY cannot work with PEM files. PuTTY has a tool named PuTTYgen, which can convert keys to the required PuTTY format (.ppk). You must convert your private key into PuTTY format (.ppk) before attempting to connect to your instance using PuTTY.
- Convert your PuTTY-gen private key to OpenSSH readable key
- Start PuTTYgen (All Programs > PuTTY > PuTTYgen).
- Under Type of key to generate, select SSH-2 RSA.
- Click Load. By default, PuTTYgen displays only files with the extension .ppk. To locate your .pem file, select the option to display files of all types(*.*).
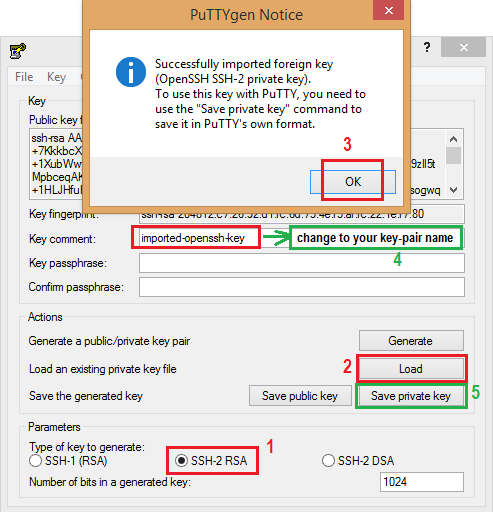
- Change Key comment into your instance Key Pair Name made up by you when you created the instance's key pair.
- Click Save private key to save the key in the format that PuTTY can use. PuTTYgen displays a warning about saving the key without a passphrase. Click Yes. Note: A passphrase on a private key is an extra layer of protection, so even if your private key is discovered, it can't be used without the passphrase. The downside to using a passphrase is that it makes automation harder because human intervention is needed to log on to an instance, or copy files to an instance.
- Specify the same name for the key that you used for the key pair (for example, my-key-pair). PuTTY automatically adds the .ppk file extension.

Your private key is now in the correct format for use with PuTTY. You can now connect to your instance using PuTTY's SSH client.
- Connect using a private key
- To do so, you need to specify a path to your private key first.
- Open PuTTY
- Navigate to Connection>SSH>Auth>Private key file for authentication (Browse...)
- Open location of the PPK file to be used for the connection
- Save the session
- Open the session to initiate the connection.
Convert .pem and .ppk private keys
.pem is OpenSSH private key format whereis .ppk is PuTTY prive key format. The puttygen cross platform tool can convert keys.
- Convert in Ubunu
$   sudo apt-get install putty-tools
$   puttygen yourKey.ppk -O private-openssh -o yourKey.pem
$   puttygen yourKey.pem -O private         -o yourKey.ppk
- Convert in Windows
c:\ puttygen yourKey.pem -O private -o yourKey.ppk
-ooutput file-O privateoutput PuTTY private key format-O private-opensshexport OpenSSH private key-O private-sshcomexport ssh.com private key
PuTTY Pageant - pre-load a private key for password less login
PuTTY Pageant is an agent that holds in a memory a list of private keys (PPK files). When you connect via PuTTY and type in a user name the agent (Pageant) is using matching key to log you in.
- How to use Pageant
Double-click on the PPK file to load into PuTTY Pageant key agent that holds keys in RAM and use them for each connection you do using PuTTY

On successful login in you will see message verifying that you authenticated using a key form an agent (read Pageant)

Remove host from SSH known_hosts file
SSH in Linux stores fingerprints of authorized hosts that can connect to the system in ~/.ssh/known_hosts file. This file is used to detect if a host has changed or may have been compromised. However, recent OpenSSH versions hash the hostname in this file, which is good for security but means you can't just go in and edit the known_hosts file if you want to remove an entry (e.g. the server has been re-built and it now has new fingerprint). The command below will remove an entry for 'a hostname' from your known_hosts file. It also works with IP addresses.
ssh-keygen -R hostname
Generate pub from private key
ssh-keygen -y -f mykey.pem > mykey.pub
Thumbprint aka fingerprint of public key
Sometimes we may have a number private keys and when comparing names it could be confusing. Therefore to uniquely identify the we can use public key thumbprint. Note it's not possible to get private key thumbprint and that would be insecure to share such information. Also useless for a server side. Therefore the snippet below generate public part then generate fingerprint base on it. This also will represent private part of the keypair.
$ file id_rsa #confirm type of file first
id_rsa: PEM RSA private key
for i in $(ls -1 *.pem); do printf "$i "; timeout 10 ssh-keygen -lf /dev/stdin <<< $( ssh-keygen -f ~/.ssh/${i} -y ); done | column -t
This uses the bash here string <<< in order to have stdin available as a regular file /dev/stdin rather than a pipe as ssh-keygen will only operate on a file. As of Release 7.2 of openssh ssh-keygen supports fingerprinting from standard input: ssh-keygen(1): allow fingerprinting from standard input, e.g. "ssh-keygen -lf -".
EC2 Security Group
Remember to assign the security group that applies to your scheme on your instance. Having port open on the instance does not mean you will be able to access from outside. It must bypass EC2 Security Group first. Overview below:

Troubleshooting
Error: Could not open a connection to your authentication agent
Ensure ssh-agent is enabled and if not use commands below to run in background:
If you are using Git Bash, turn on ssh-agent:
  ssh-agent -s
# Agent pid 59566
If you are using another terminal prompt, such as msysgit, turn on ssh-agent:
  eval $(ssh-agent -s)
# Agent pid 59566
Eval command line break down:
- syntax
$(ssh-agent -s)is equivalent of backticks`ssh-agent -s`and means evaluate and run as a command:
$ ssh-agent -s
SSH_AUTH_SOCK=/tmp/ssh-uW2ldhYdWXF4/agent.11701; export SSH_AUTH_SOCK;
SSH_AGENT_PID=11702; export SSH_AGENT_PID;
echo Agent pid 11702;
ssh-agent -sreturns environment variables soevalcommand tells to shell to run the command output as a script
Mobile secure shell
New generation of ssh try mosh