Difference between revisions of "AWS/Connect over SSH to EC2"
| Line 10: | Line 10: | ||
-rw-r--r-- piotr:piotr authorized_keys #contains PUB keys that allow to login without password whoever has matching PRV key | -rw-r--r-- piotr:piotr authorized_keys #contains PUB keys that allow to login without password whoever has matching PRV key | ||
- | -r-------- piotr:piotr id_rsa #contains PRV key of this user on the current system | ||
-rw-r--r-- piotr:piotr id_rsa.pub #contains PUB key that can be copied/(append to authorized_keys file) on another system | -rw-r--r-- piotr:piotr id_rsa.pub #contains PUB key that can be copied/(append to authorized_keys file) on another system | ||
allowing ssh logon without password | allowing ssh logon without password | ||
Revision as of 00:08, 28 December 2015
Theory: private and public keys
Ssh protocol can authenticate a user without password by using a key pair of private and public keys combination


- OpenSSH - secure keys management
Each user home directory has ~/.ssh/ hidden subdirectory may have following files:
-rw-r--r-- piotr:piotr authorized_keys     #contains PUB keys that allow to login without password whoever has matching PRV key
-r-------- piotr:piotr id_rsa              #contains PRV key of this user on the current system
-rw-r--r-- piotr:piotr id_rsa.pub          #contains PUB key that can be copied/(append to authorized_keys file) on another system
                                                                    allowing ssh logon without password
Files id_rsa and id_rsa are a key pair generated on the current system.
Download Key Pair from EC2 Instance
Your private key is created when you setup EC2 instance and is listed under EC2 Dashboard > NETWORK & SECURITY > Key Pairs, you should have downloaded a copy of the private key onto your local machine during the instance creation. The key pair used to connect to the specific instance is listed on the Instances screen > Key Pair Name:

Generate private PEM key and public PUB key on Linux client
The key pair can be also manualy generated. Here are steps to follow to create a matching key pair on Linux machine. The command ssh-keygen generates a private/public key pair in a current directory. The file without the extension it is private key, use cat mykey to preview. During the key generating you will be prompted for passphrase that adds extra layer of security but it can be ignored by pressing [enter] twice.
ssh-keygen -t rsa
You should change a file permissions of the key to read_only by the owner as per Getting Started with Amazon EC2 Linux Instances
chmod 400 mykey.pem
-r------- 1 user user 1766 Aug 18 01:17 mykey.pem
Copy public PUB key to the EC2 instance authorized_keys
The key pair has been generated on local Linux machine. Theory says that we can share the public key with anyone. Therefore using SCP programme we can copy mykey.pub from local machine to a remote machine. In our case the remote is EC2 instance.
From a local linux box copy the public key over to the remote host
scp ~/.ssh/mykey.pub ubuntu@ec2-user@ec2-99-99-99-99.compute-1.amazonaws.com:/home/ubuntu/.ssh/
On the remote EC2 instance/linux box append the public_key mykey.pub to authorized_keys file. This is known as installing the public key to a server.
ssh {ubuntu|ec2-user}@ec2-99-99-99-99.compute-1.amazonaws.com
cat ~/.ssh/mykey.pub >> ~/.ssh/authorized_keys
Connect to the EC2 instance
- Ubuntu user: ubuntu (confirmed)
- RedHat user: root (tbc)
- Amazon branded instances: ec2-user (confirmed)
- CentOS user: centos (tbc)
Connect from Linux
Connecting and useful flags -l username specifies Linux account user name, -v verbose mode
ssh -i mykey.pem ubuntu@ec2-user@ec2-99-99-99-99.compute-1.amazonaws.com
Connecting from Windows
PuTTY does not natively support OpenSSH private key format (.pem) generated on Amazon EC2 instance. This private key file is in a form called PEM – "Private Enhanced Mail". PuTTY cannot work with PEM files. PuTTY has a tool named PuTTYgen, which can convert keys to the required PuTTY format (.ppk). You must convert your private key into PuTTY format (.ppk) before attempting to connect to your instance using PuTTY.
- How to convert your PuTTY-gen private key to OpenSSH readable key
- Start PuTTYgen (All Programs > PuTTY > PuTTYgen).
- Under Type of key to generate, select SSH-2 RSA.
- Click Load. By default, PuTTYgen displays only files with the extension .ppk. To locate your .pem file, select the option to display files of all types(*.*).
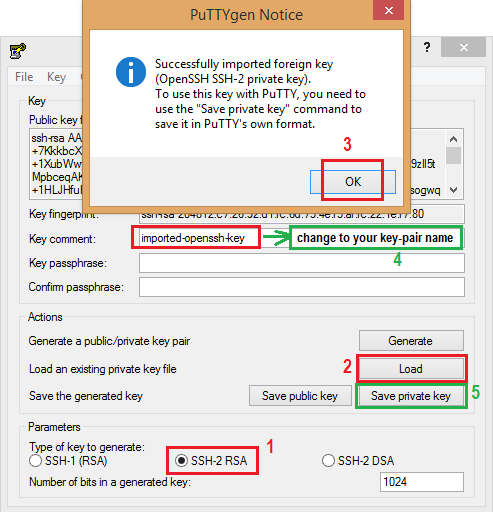
- Change Key comment into your instance Key Pair Name made up by you when you created the instance's key pair.
- Click Save private key to save the key in the format that PuTTY can use. PuTTYgen displays a warning about saving the key without a passphrase. Click Yes. Note: A passphrase on a private key is an extra layer of protection, so even if your private key is discovered, it can't be used without the passphrase. The downside to using a passphrase is that it makes automation harder because human intervention is needed to log on to an instance, or copy files to an instance.
- Specify the same name for the key that you used for the key pair (for example, my-key-pair). PuTTY automatically adds the .ppk file extension.

Your private key is now in the correct format for use with PuTTY. You can now connect to your instance using PuTTY's SSH client
- How to use PPK private key file for password less connection
- Double-click on the PPK file to load into PuTTY Pageant key agent that holds keys in RAM and use them for each connection you do using PuTTY
- Or open PuTTY, navigate to Connection>SSH>Auth>Private key file for authentication (Browse...) to specify location of the PPK file to be used for the connection
Remove host from SSH known_hosts file
SSH in Linux stores fingerprints of authorized hosts that can connect to the system in ~/.ssh/known_hosts file. This file is used to detect if a host has changed or may have been compromised. However, recent OpenSSH versions hash the hostname in this file, which is good for security but means you can't just go in and edit the known_hosts file if you want to remove an entry (e.g. the server has been re-built and it now has new fingerprint). The command below will remove an entry for 'a hostname' from your known_hosts file. It also works with IP addresses.
ssh-keygen -R hostname
EC2 Security Group
Remember to assign the security group that applies to your scheme on your instance. Having port open on the instance does not mean you will be able to access from outside. It must bypass EC2 Security Group first. Overview below:
