Difference between revisions of "Jenkins/Install and Plugins"
< Jenkins
Jump to navigation
Jump to search
| Line 51: | Line 51: | ||
jenkins ALL=(ALL) NOPASSWD: ALL | jenkins ALL=(ALL) NOPASSWD: ALL | ||
$ jenkins@master $ ssh-copy-id jenkins@minion #add ssh public key to slave node so master can send jobs to it | $ jenkins@master $ ssh-copy-id jenkins@minion #add ssh public key to slave node so master can send jobs to it | ||
= Configure ssh plugin = | |||
#Install ''ssh plugin'' from Manage Jenkins > Manage Plugins > click on Available tab and search for '''ssh''' | |||
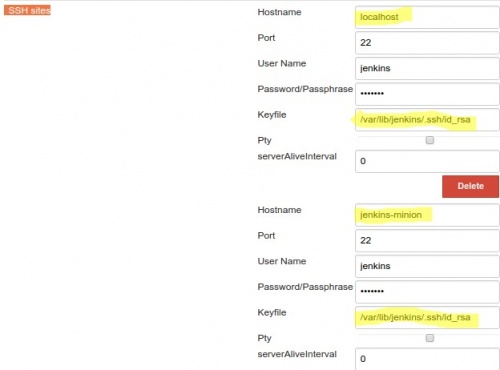
#Configure remote hosts that Jenkins can connect goto Manage Jenkins > Configure System and fill in '''SSH remote hosts''' section with similar | |||
[[File:Jenkins-ssh-remote-hosts.jpg|500px|none|left|Jenkins-ssh-remote-hosts]] | |||
Revision as of 21:31, 1 May 2017
Install Jenkins
Pre-requisites: Java
Install Jenkins on Ubuntu from repository
wget -q -O - https://pkg.jenkins.io/debian-stable/jenkins.io.key | sudo apt-key add -
Add repo to sources.list
sudo sh -c 'echo deb http://pkg.jenkins.io/debian-stable binary/ > /etc/apt/sources.list.d/jenkins.list'
sudo apt-get update && sudo apt-get install jenkins
Verify
cat /etc/passwd | grep jenkins #check if user has been created without shell
service jenkins status     #check if service is running
First run
- Password preview
sudo vi /var/lib/jenkins/secrets/initialAdminPassword - Url http://localhost:8080
- Select plugins you wish to install using web based wizard
- Once all downloaded, create your Admin user
- Once completed you will see: "Jenkins is ready! Your Jenkins setup is complete.", press Start Jenkins
Proxy if needed
If you run on restricted port system you cannot control the box firewall you may want to proxy your connection to Jenkins port :8080. You can install nGinx to do this for you
sudo apt-get install nginx
sudo vi /etc/nginx/sites-enabled  #then enable proxy_pass
   location / {
      proxy_pass http://127.0.0.1:8080;
      }
Configure ssh keys and permissions
Jenkins master node
$ sudo hostnamectl set-hostname jenkins-master
$ sudo vi /etc/passwd  #make sure jenkins user hava access to shell
$ sudo passwd jenkins  #set a password
$ sudo su jenkins      #become jenkins user
$ cd ~ && ssh-keygen   #generate ssh key pair
$ ssh-copy-id jenkins@localhost  #add public key to Jenkins (localhost) server, these might be minions workers
$ sudo visudo  #allow jenkins user to run sudo without password prompt and disble requireTTY; makes easier to run builds
  jenkins ALL=(ALL)     NOPASSWD: ALL
  Defaults  !requiretty
The !requiretty will allow Jenkins to run bash scripts in a background otherwise you receive an error:
sudo: no tty present and no askpass program specified
Build step 'Execute shell' marked build as failure
Jenkins slave (minion) worker
There is no need to install anything apart allowing the master node to ssh to it
$ sudo hostnamectl set-hostname jenkins-minion
$ sudo adduser jenkins
$ sudo passwd jenkins   #set a password, may mach the master node one but not necessary
$ sudo visudo  #allow jenkins user to run sudo without password prompt; makes easier to run builds
  jenkins ALL=(ALL)     NOPASSWD: ALL
$ jenkins@master $ ssh-copy-id jenkins@minion   #add ssh public key to slave node so master can send jobs to it
Configure ssh plugin
- Install ssh plugin from Manage Jenkins > Manage Plugins > click on Available tab and search for ssh
- Configure remote hosts that Jenkins can connect goto Manage Jenkins > Configure System and fill in SSH remote hosts section with similar
