Vmware sync virtual machines time with hypervisor over NTP
How to configure NTP client and server
VMware network time synchronization: A walkthrough To configure NTP synchronization, select the host, and on the Configuration tab, select Time Configuration under Software. You'll now see the existing time synchronization status on that host. Next, click Properties. This selection shows the Time Configuration screen, where you can see the current time on the host. Make sure it’s not too different from the actual time, because a host that’s more than 1,000 seconds is considered “insane” and won't synchronize.
After you set the local time on the host, select NTP Client Enabled. This activates NTP time synchronization for your host. Reboot the server, then go to Options to make sure NTP has been enabled. This gives you access to the NTP Startup Policy, where you should select “Start and stop with host.”
You’re not done with network time synchronization yet, though. Now, you need to choose NTP servers that your VMware ESXi hosts should synchronize with. Click NTP Settings and you’ll see the current list of NTP servers. By default, it’s empty. Click Add to add the name or address of the NTP server you'd like to use. The interface prompts you for an address, but you can enter a name that can be resolved by DNS as well.
If you're not sure which NTP server to use for VMware network time synchronization, the Internet NTP servers in pool.ntp.org work well. You only need to choose one server from this group to add to the NTP servers list. If you want to synchronize with an internal or proprietary NTP server, however, you should specify at least two NTP servers.
At this point, make sure the option to restart the NTP server is selected. Click OK three times to save and apply your changes. From the Configuration screen on your ESXi host, you should now see that the NTP Client is running, and it will also show the list of current NTP servers your host is using.
With your ESXi hosts synchronized to the correct time, all the services and events that depend on time will function properly. More importantly, you won’t waste any more time because of misconfigured network time.
How to enable NTP server?
Once you have configured ESXi 5.0 to act as a NTP client it will also automatically act as a NTP server! The NTP daemon (/sbin/ntpd) does both at the same time, and its configuration file (/etc/ntp.conf) even allows any other machine to query it by default. There is only one hurdle: the ESXi 5.0 firewall. By default it blocks the port for incoming NTP queries (UDP port 123). We need to create a custom firewall extension to open that port. KB2005304 explains how to do this. Basically you need to create a custom XML configuration file in the directory /etc/vmware/firewall, e.g. /etc/vmware/firewall/ntpd.xml with the following contents:
<ConfigRoot>
  <service>
      <id>NTP Daemon</id>
      <rule id='0000'>
          <direction>inbound</direction>
          <protocol>udp</protocol>
          <porttype>dst</porttype>
          <port>123</port>
      </rule>
      <enabled>false</enabled>
      <required>false</required>
  </service>
</ConfigRoot>
(Take care when you copy or modify this: The XML tags are case sensitive!)
Then load the new configuration by running the following command inside a ESXi shell:
esxcli network firewall refresh
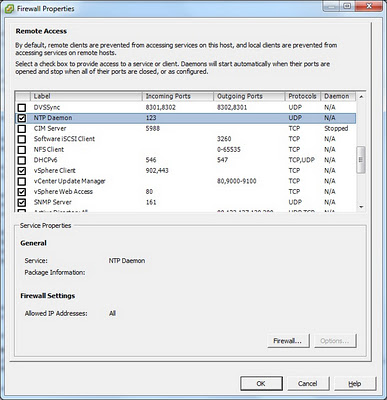
After that you can see the custom firewall rule in the firewall properties dialog of the vSphere client:
Enable the rule, and you are done ... ... until the next reboot of the host, because User defined xml firewall configurations are not persistent across ESXi host reboots. The KB article that describes this problem also includes a work-around to resolve it: Put the XML file on a shared datastore and modify the /etc/rc.local boot script to copy the file to the correct location on every reboot.
This works, but I personally consider this an ugly hack, because this modification is not inherent in the system but introduces a dependency to an external resource (the datastore). So I created a VIB file that you can effectively install on ESXi and that will permanently add the XML file to the system. Run the following commands inside an ESXi shell to install the VIB file:
esxcli software acceptance set --level CommunitySupported
esxcli software vib install -v http://files.v-front.de/fwenable-ntpd-1.2.0.x86_64.vib
The first command is needed for ESXi to accept the custom VIB, because it does not include a trusted signature file. The second command will download and install the VIB file (Note: you can also download the file with a browser, store it on a local datastore and reference the local file with the install command). The installation will not require the host to be in maintenance mode and it will be immediately effective without the need to reboot the host! It will also automatically reload the firewall rules, so the only step left is to enable the rule in the vSphere client.
By the way, I created this VIB file with a new and improved version of my TGZ2VIB5 script that I currently work on. Once I have finished this new version and made it available here I will also post a detailed description of how I created the VIB file.

