Difference between revisions of "AWS"
| Line 34: | Line 34: | ||
;To convert your private key | ;To convert your private key | ||
#Start PuTTYgen (All Programs > PuTTY > PuTTYgen). | # Start PuTTYgen (All Programs > PuTTY > PuTTYgen). | ||
#Under '''Type of key to generate''', select '''SSH-2 RSA'''. | # Under '''Type of key to generate''', select '''SSH-2 RSA'''. | ||
# | # Click '''Load'''. By default, PuTTYgen displays only files with the extension <tt>.ppk</tt>. To locate your <tt>.pem</tt> file, select the option to display files of '''all types(*.*)'''. [[File:Import-pem-key-into-puttygen.png|center|Import-pem-key-into-puttygen]] | ||
[[File:Import-pem-key-into-puttygen.png| | # Change '''key comment''' into your instance Key Pair Name made up by you. | ||
#Change '''key comment''' into your instance Key Pair Name made up by you. | # Click Save private key to save the key in the format that PuTTY can use. PuTTYgen displays a warning about saving the key without a passphrase. Click Yes. | ||
#Click Save private key to save the key in the format that PuTTY can use. PuTTYgen displays a warning about saving the key without a passphrase. Click Yes. | |||
== EC2 Security Group == | == EC2 Security Group == | ||
Revision as of 11:57, 2 February 2014
SSH to EC2 instance
Theory
SSH theory using a private and public key


Locate Key Pair on the EC2 Instance screen
Your private key is created when you setup EC2 instance and is listed under EC2 Dashboard > NETWORK & SECURITY > Key Pairs, you must have downloaded a copy of the private key onto your local machine during the instance creation. The key pair used to connect to the specific instance is listed on the Instances screen > Key Pair Name:

Generate private PEM key and public PUB key on Linux client
The command below will generate private/public key pair in the current directory. The file without the extension it is private key, please cat mykey to preview. You will be prompted for passphrase what it adds an extra of security but it can be ignored by pressing [enter] twice.
ssh-keygen -t rsa
Change permissions of the key to ready only by owner as per Getting Started with Amazon EC2 Linux Instances
chmod 400 mykey.pem
-r------- 1 user user 1766 Aug 18 01:17 mykey.pem
Copy public PUB key to the EC2 instance
Copy mykey.pub public PUB key to EC2 instance
scp ~/.ssh/mykey.pub ubuntu@ec2-user@ec2-99-99-99-99.compute-1.amazonaws.com:/home/ubuntu/.ssh/
Login to the instance and append mykey.pub to authorized_keys this is know as nstalling the public key to server
ssh ubuntu@ec2-user@ec2-99-99-99-99.compute-1.amazonaws.com
cat ~/.ssh/mykey.pub >> ~/.ssh/authorized_keys
Connect to the EC2 instance
- Ubuntu user: ubuntu (confirmed)
- RedHat user: root (tbc)
- Amazon branded instances: ec2-user (confirmed)
From Linux
Connecting and useful flags -l username specifies Linux account user name, -v verbose mode
ssh -i mykey.pem ubuntu@ec2-user@ec2-99-99-99-99.compute-1.amazonaws.com
From Windows
PuTTY does not natively support the private key format (.pem) generated by Amazon EC2. This private key file is in a form called PEM – “Private Enhanced Mail”. PuTTY cannot work with PEM files. PuTTY has a tool named PuTTYgen, which can convert keys to the required PuTTY format (.ppk). You must convert your private key into this format (.ppk) before attempting to connect to your instance using PuTTY.
- To convert your private key
- Start PuTTYgen (All Programs > PuTTY > PuTTYgen).
- Under Type of key to generate, select SSH-2 RSA.
- Click Load. By default, PuTTYgen displays only files with the extension .ppk. To locate your .pem file, select the option to display files of all types(*.*).
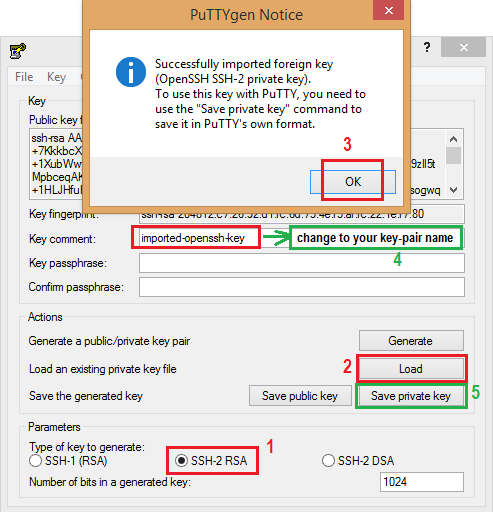
- Change key comment into your instance Key Pair Name made up by you.
- Click Save private key to save the key in the format that PuTTY can use. PuTTYgen displays a warning about saving the key without a passphrase. Click Yes.

EC2 Security Group
Remember to assign the security group that applies to your scheme on your instance. Having port open on the instance does not mean you will be able to access from outside. It must bypass EC2 Security Group first. Overview below:
